Replacing the Rear Coolant Flange
on an A4 1.8 L (B6)
I wanted to add some detail to the write ups already online. Prices are as of September 2010.
Some of the other write-ups online:
The only way I could even find this leak was by just barely being able to slip my arm and a camera past the
heat shields and snap a photo from over the transmission. It helps to have a clean engine when looking for oil
leaks, but in this case it's the crystallized deposits give away a coolant leak. Note that you cannot fix the
leak by simply tightening the bolts to the flange. In the first place you can't get to the bolt/studs. Even if
you can there is a second nut on each stud securing a pipe. Also the problem is not due to the flange being
insufficiently secured to the block.
Parts:
- New coolant flange (should come with o-ring already installed) $25 online, $32 dealer. You could
probably change only the gasket, but once you go through all the work to get there you'll wish you had
forked over an extra $25 for a little more assurance.
- Might as well get a new o-ring for the temperature sensor as it's about $1. The old one was probably
fine and it is possible to get to the sensor
removing only the big black crankcase valve above it. You could also buy one of the plastic clips that
secures the sensors in case you break the old one or loose it when doing this job or any future
coolant changes. A new sensor is about $15 if you want to change that while you're there.
- Pentosin G 12 coolant; $15. It's fine to reuse the old stuff if it's still red (or purple), but you'll
loose a little when you pull the rear hose to the coolant flange. It can be the red stuff or the newer
Audi purple modified G12+, but nothing else mixed with the factory fill. If you pull a top coolant
hose and blow through it after draining that may get most of the coolant remaining in the lines, but I
don't know if that would clear the lines to the heat exchanger so that you don't loose any when
pulling the hoses off the coolant flange.
- hose clamps (I used 2 or 3 each of large, medium and small clamps)
- zip ties for all that you cut to move wires clear
- New combi-valve gasket (optional). Mine came off cleanly with the valve so I reused it. It's a hard
gasket like on a manifold.
Tools:
- crescent and sockets: 8 & 10 mm (shorter is better in this case)
- allen-head hex wrenches: 5 & 6 mm
- screw drivers
- needle-nose pliers and any other device you can think of to wrestle those damn Audi hose clamps (I
recently googled and read that if you put pliers on the crimped part of the clamp and twist back and
forth it will eventually pop open--haven't tried yet)
- magnetic picker-upper thingy (used more than once on this project)
- many hours depending on your clamp removing technique in cramped quarters
- healthy supply of expletives
Directions
This is what you're getting into. Some also remove the air filter box. If you have Popeye forearms you may
want to do that. I found that removal of the EGR-like Combi-valve (#19 in diag.2) was the key to gaining
enough access to the coolant flange.
First get rid of the pipes and combi-valve that are in the way (diags. 1 & 2 from the ETKA).
- Heat shield (diag2-14) can come off first. (Woo hoo I found a 5 mm hex wrench that had vanished 4
years ago.)
- I've left connectors that don't have to be removed colored black.
- The silver oil line (not shown in diags., but is shown below in photos) should be unfastened from the
engine block so that it can be slid back off the coolant flange stud.
- The bolts (diag2-#24) to the combi-valve are long. It's easier to loosen them and remove the valve
with the bolts.
- The bolts for the pipes and combi-valve and the coolant flange are torqued to 10 Nm (no way to get a
torque wrench in there. 10 Nm is 7 lbs of force at a distance of 1 foot--maybe 20 to 30 lbs using a
short crescent wrench, but by no means brute force.) As far as the coolant flange goes it tightens
down flush to the engine head squishing the o-ring by the designed amount. No further tightening will
change that.
- The connector to the sensor on the camshaft chain tensioner above the coolant flange can be removed.
Pull off the wire clip. Then slide off the connector.
- I also pulled the coil pack wire harness for the spark plugs out of the way. You should probably cover the ground cable
end so you don't accidentally short anything if you haven't disconnected the battery.
If you weren't optimistic, but you've gotten this far and have access to the flange it's time to drain the coolant. If you plan on
flushing the coolant because it is brown due to some incompetent filling with the wrong coolant then do that
first before opening all those pipes. I had recently done my timing belt so there was no need and I reused the
coolant this time.
- Remove belly pan. Pull clip that retains temperature sensor. Pull sensor and drain into a bucket.
- The clip and o-ring for the sensor to drain the coolant are the same style used for the sensor at the
top of the coolant flange.
- If you would also like a personal introduction to the type of quick-release hose connection at the
bottom of the coolant flange (diag4-#38) that will be removed somewhat blindly, check out the other
#38 hose on the driver side of your engine. The person who called that "quick" must have an
f-ed up sense of time (at least it's quick to reattach).
- It's far easier to leave the side hose (daig4-#21) connected to the flange. Disconnect it from the
metal tube that runs over the intake manifold. Mine had a pierced lobe with a hole to support another
pipe (photo below). That was just one more of those cursed Audi hose clamps to remove where you can
barely get to it.
Diagram:
Photo 1: You don't need to mess with the fuel line running over everything from the back to the fuel rail
on the driver's side of the engine.
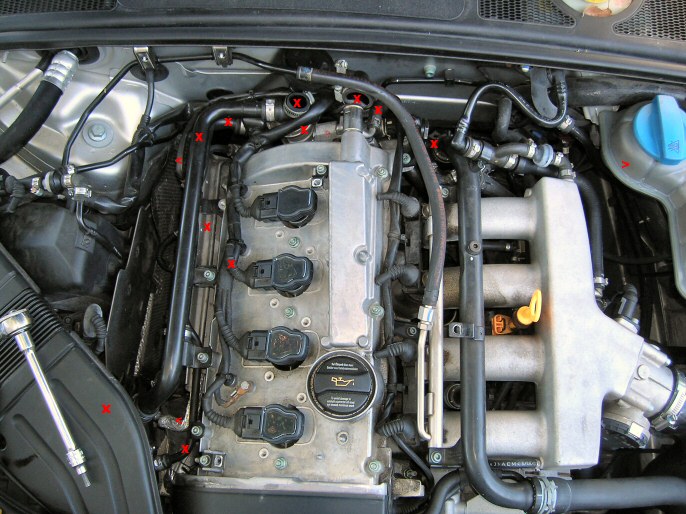
Photo 2: the removed parts. If you try to clean the metal tubes be aware the inside is also painted and a
strong solvent will remove the paint too.
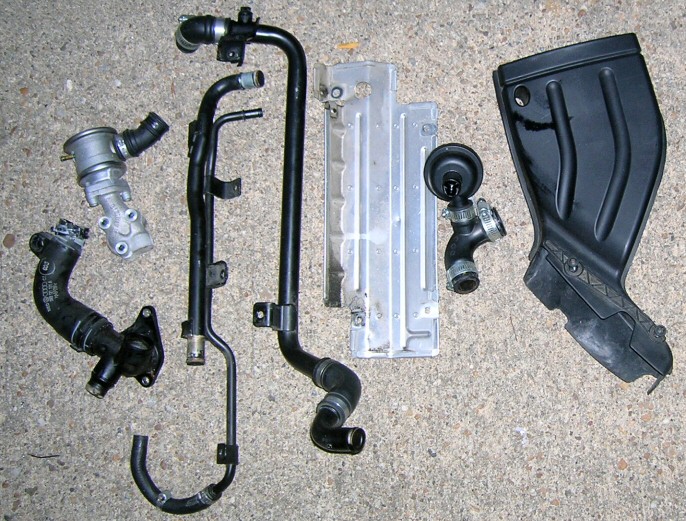
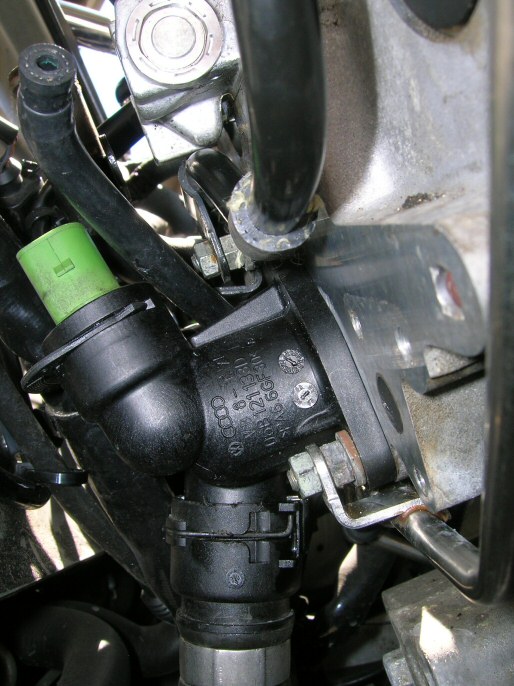
Photo 3: The leaky coolant flange.
Photo 4: Side view of coolant flange and quick-release hose connection. Combi-valve should be removed. Hang
onto the wire clip as you remove it. Mine flew.
Photo 5: Top view. Now we have access to the coolant flange
Photo 6: The old coolant flange. No obvious reason for the leak. The o-ring had become permanently
flattened.
Photo 7: The new flange showing the studs with pipes secured by the top nuts. Make sure you clean up the
head surface well. I used a rag with solvent to remove rubber from the old gasket (didn't want to risk
scratching the head by scraping).
Still don't know what's up with the part numbers. ETKA lists it as 06B-121-132-E (06B121132E). That's the
number that comes up when looking on the online retailers. Still my old one turned out to be 06B121133
and even though I ordered the former I was sent 06B121133D. AutohausAZ wrote back informing me that's the most
recent part number. As far as they can tell the design form hasn't changed but they may have changed the
polymer.
Took another photo a few days later. No leaks.
If you notice any gross build-up of oil deposits with the oil filler cap removed now would also be a good
time to remove the valve cover. A new valve cover
gasket costs $15 online, but the gasket is sturdy. If you're careful once you start to work the cover
loose and before pulling it away more than a few mm, use a dull screwdriver on the side of the gasket to loosen the
it wherever it
is sticking to the cover so that it remains on the engine head. If you're not the careful type leave two nuts at opposite corners loosened a couple of
mm while working the cover loose. The nuts go back on to 10 Nm starting with the center,
then doing the outer nuts diagonally (I would use the torque wrench for these. Over tightening a rubber gasket
isn't a good idea).
--Art