| Although this A4 is still within the 4yr/50000 mile warranty,
Audi is calling it an "abused vehicle" because the previous
owner went 500 miles over their prescribed oil change limit and is
therefore refusing to honor any warranty claims whatsoever
regardless of any relation to sludge. This includes reneging on the included 40K service work.
They weasel out of the warranty even though they erred by specifying 10,000+ mile oil changes with mineral oil, a small oil filter and low oil capacity. |
So You Think You Have SludgeLook Under The Oil Filler CapThe test for sludge is very simple. Remove your oil filler cap and look inside. It shouldn't be all black inside. Your main view is of the plastic oil diverters over the camshaft bearing caps. Those are black. Most everything else is silvery metal, though your view is very limited. It's all right if there is a semi-transparent varnish coating. If you can scrape off a thick, tar-like substance with your fingernail you have a problem.This shows the view since my engine was cleaned.
There's no need to post a before shot because it would be all black. If you doubt that take a look at my valve cover as it was. Another simple test is to put your drained
oil through a paint filter and check for carbon particles. |

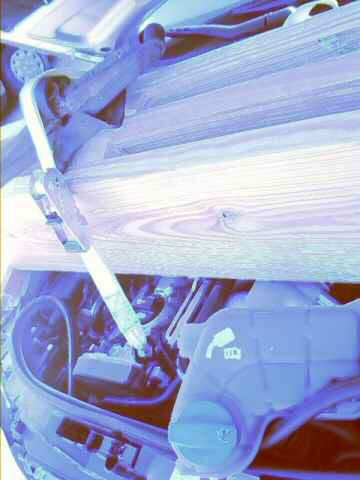
Installing an Oil Pressure GaugeOne obvious place to connect the oil gauge sender is at the location of the stock warning sender. I wanted to leave the warning light intact so I installed my gauge in place of the plug marked in red in this diagram from the Bentley manual.
I can't be sure that this is the best site, but it showed me when my pressure was low and it shows my pressure within the proper range since the sludge repairs. It is also at least as accessible as any other spot. I moved the radiator overflow tank aside to get what was at best limited access. I went with a cheap mechanical gauge with nylon tubing, thinking that I could upgrade later if necessary. The mechanical gauges are said to be more accurate and to have quicker response than the electrical senders. I figured there was no reason to look for copper line based on the warnings I had heard about vibrations eventually cracking it. I already had 6' of 5/8" i.d. windshield washer hose around the house so I stuffed the nylon hose in that. It kinked a little when I tried to push too much at once. Pushing in no more than 3/4" at a time worked well. Once it was in the rubber hose it behaved well during the install. To gain access for the install I removed the plastic engine cover, the weather stripping that holds the long plastic cover over the rear of the engine bay, and I pushed the coolant reservoir out of the way. Only one screw to remove the reservoir, but the plastic prongs that go into the metal tabs on the firewall were hard to work free (pulled up and towards the front on the reservoir). I used ratchet extensions and a swivel to get the plug out and put in
the sender. Then I used a small crescent wrench to fasten the hose with
its compression fitting. After dropping wrenches and having to fish them
out of the belly pan it finally dawned on me that I could tie a string
to the wrench.
There are two firewalls. On the engine side I peeled back the weather stripping and ran the hose above an oblong grommet for two metal lines. The hose is marked in the image below. It then runs to the left from there between the two firewalls.
Pressure Specs
19 psi @ idleReadings I got on the first test drive: 20 psi @ idleIt got to about 70 psi during hard acceleration. At the time I wrote: I'm thinking the 45 is close enough. Anything to worry about? -- This car had its oil pump replaced at 25k miles and has had oil light warnings since. I'm thinking that now with the proper oil, filter and interval specs the sludge problem has been reduced to one where the sludge is gradually being cleaned up and is clogging the filter. The dealer has my next oil change interval at 2000 miles. [7/19/2005]It wasn't long before the pressure dropped again: 1300 miles since the oil change and now my pressure won't get above 30 psi (2 bar). [7/25/2005]Finally, the oil warning light came on when the pressure was about 20 psi and below while driving. Since this car has valve tappets which require a minimum pressure (else they begin to make a loud racket), the warning pressure threshold is higher than other cars which may not warn until the pressure drops to about 6 psi. I never reached the point where the tappets clattered. |

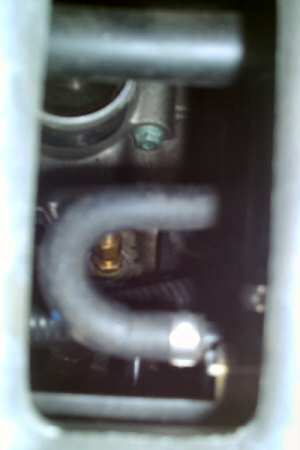 This
is viewed from above from the driver's side looking through the intake
manifold. There is nothing enjoyable about manipulating parts and tools
down there. You should start this part of the installation first. If you
give up there's no sense in having a gauge installed in the cockpit. You
can see the brass pipe fitting that screws into the oil filter housing
and the brass compression fitting nut that secures the white nylon hose
(which is just barely visible before being blocked by the U-shaped hose
in front).
This
is viewed from above from the driver's side looking through the intake
manifold. There is nothing enjoyable about manipulating parts and tools
down there. You should start this part of the installation first. If you
give up there's no sense in having a gauge installed in the cockpit. You
can see the brass pipe fitting that screws into the oil filter housing
and the brass compression fitting nut that secures the white nylon hose
(which is just barely visible before being blocked by the U-shaped hose
in front).

 On
the inside I cut a hole through an unused round grommet shown in close
up in the inset. I mounted the gauge on the black plastic. I used the full
6' of hose. The gauge is partially blocked from view when I am driving
so that I can't read the number at the top of the dial. I can still see
the needle though. There is a chance of breaking the line when getting
in and out of the car. That would cause a lot of oil to spill if the engine
were running. (At over 20 psi I'm guessing it would be like a super soaker
water gun). I plan to secure a larger piece of hose with electrical tape
to cover the transition between the coupling nut and the rubber hose.
On
the inside I cut a hole through an unused round grommet shown in close
up in the inset. I mounted the gauge on the black plastic. I used the full
6' of hose. The gauge is partially blocked from view when I am driving
so that I can't read the number at the top of the dial. I can still see
the needle though. There is a chance of breaking the line when getting
in and out of the car. That would cause a lot of oil to spill if the engine
were running. (At over 20 psi I'm guessing it would be like a super soaker
water gun). I plan to secure a larger piece of hose with electrical tape
to cover the transition between the coupling nut and the rubber hose.My Dealings with My Audi Dealer
I will finish this section when I have finished dealing with them.Until then you can always search the audifans archives or google alt.autos.audi.
Admitting you have a problem (They won't want to)
Removing Sludge From the Audi 1.8T Engine
The Audi Sludge Letter
http://www.autosafety.org/uploads/phpcJXhzy_AudiOilSludge.pdfhttp://www.quattro123.com/A4TurboEngineWarrantyExtension.htm
http://forums.audiworld.com/a4/msgs/2137644.phtml
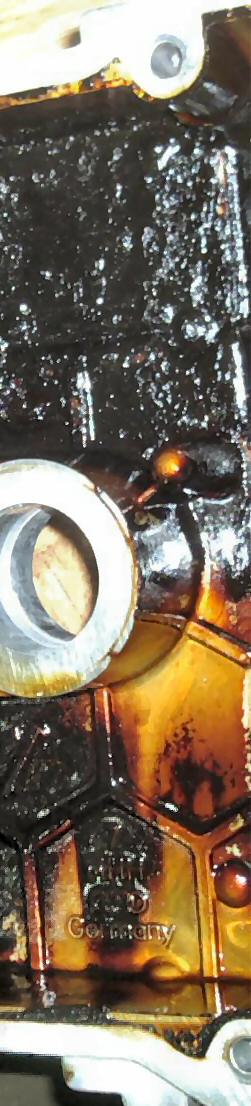
The Audi Sludge TSB (Technical Service Bulletin)Here it is:http://www.pookrat.com/uploads/pics/TSB.pdf According to the TSB the state of the camshaft bearings is the test to determine if the engine should be salvaged. Apparently this is because these bearings are at the end of the pressurized oil flow path. So, it is assumed that if they are acceptable the rest of the engine is likely to be as well. It was easy to tell from the sludge around the bolts that my dealer removed only one bearing cap before telling me that my engine was salvageable. One of my intake camshaft double bearing caps.  Having performed an oil filter analysis after following the TSB's cleanup procedure, I feel the TSB cuts a big corner when specifying that the head should be scraped in place. To do it right the head should probably be pulled and soaked in solvent as shown on this Toyota engine. There is too much sludge left after scraping the head. With frequent oil changes that shouldn't be a problem. The oil gauge will let me know if the pick up screen is becoming clogged again. |
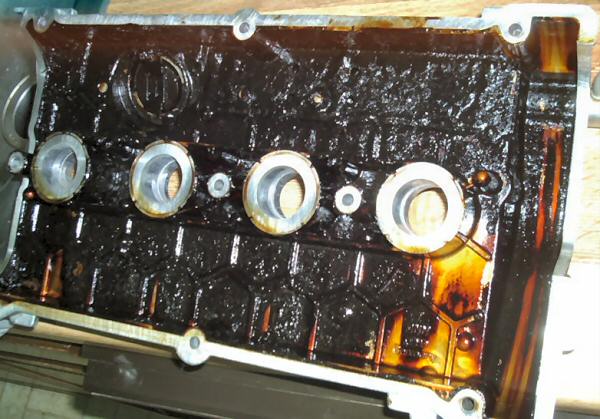
Valve Cover and Head CleaningLook what I found.Removed from the wells between the spark plugs.
The Audi dealer wanted $3400 to perform the sludge TSB work or $300+ to replace the valve cover so that I could take it elsewhere. So I had it towed home and began the work myself. Well since the folks at Audi were kind enough
to remove the cover for me I started with it. This stuff is hard to remove.
I soaked this in various solvents, break parts cleaner, engine degreaser...
I still needed to brush it and it still had some varnish on it when I finished.
You could try soaking parts in carburetor cleaner overnight. On the areas not immersed in oil such as the valve cover the sludge was
hard and flaky or like undercoating. On dead spots filled with oil the
sludge was soft like that on the screwdriver above. Audi does not recommend
using engine flush chemicals and based on my efforts I'd say they would
be useless on the hard stuff. I have also heard that they can cause oil
seal leaks.
This is part way into the cleaning. One of the double camshaft bearings
has been removed and cleaned. The wall connecting the spark plug wells
has been scraped, though some brownish varnish remains.
SealantsThe Audi sealants prescribed by the Bentley manual are exorbitantly expensive: about $70 for one at my dealer that I assumed must be for a vat of the stuff for the pros, but no, it was for something smaller than a toothpaste tube. It calls for sealant AMV-174-004-01 for the corners of the valve cover, AMV 188 001 02 for sealing the end bearing caps (probably anaerobic sealant typically called for in Haynes manuals and that auto parts store employees scratch their heads on), and silicone sealant D-176-404-A2 to make the oil pan gasket (there is no preformed gasket). I used Permatex Blue RTV sealant and sprang for the Ultra at $4.44 and I haven't had any oil leaks. I did have an oil leak after this repair where I couldn't find the source. This stopped when I replaced a bleeder valve that had become clogged which was probably pressurizing the crankcase (not sure if that would be the correct term/location) and blowing oil past a seal. For step by step directions on valve cover removal and some views of a healthy 1.8T see the tech article at www.audiworld.com
|
 |


 The oil pan had
hard sludge that got worse higher up on the walls of the pan. I got it
spotless using a steel wire brush wheel on a rotary tool. I tried a softer
brass brush initially, but it disintegrated too quickly.
The oil pan had
hard sludge that got worse higher up on the walls of the pan. I got it
spotless using a steel wire brush wheel on a rotary tool. I tried a softer
brass brush initially, but it disintegrated too quickly.
Crankcase Ventilation and Other Engine PeripheralsFor my car the TSB says to replace the parts circled below.
According to the dealer technician you should definitely replace the items in red. The one on the left is listed in the ETKA as a bleeder valve (#06B103245, good price here and here). The mechanic at the Audi dealer referred to it as the PCV valve. My Audi has a 3-way valve (some are straight so check your part no.; might be 035103245A ...or G?). I posted my story about this part along with the error codes caused by it to AudiFans. Piston blow by pressure has to be relieved by the bleeder valve. If it clogs the pressure will escape through oil seals causing leaks. "Flow is normally from both 2 & 13 toward 5, then 6, then out into the intake manifold. Under boost, flow is from 2, past 5, to 13, then on through 15, where it enters the intake system pre-turbo. Part 6 (The PCV Valve) is also a check valve that keeps boost air from entering the PCV system."1 The other part (circled at right) is the vacuum suction jet pump (or brake booster suction jet pump, #058133753B, best price I found). I finally got around to checking this part and found that it was perfectly clean inside. (It actually broke apart at the seam when I was trying to remove the hoses) There are alternate arrangements to that pictured above depending on VIN# (AMB up to ...8E*3*100001) where this part is connected with a hose directly to the PCV. That may be the case where clogging of this part would occur. If you try to clean the tubes and hoses be aware that the metal tubes
are painted black inside, so use some care in selecting solvents or other
cleaning agents. |

Post Sludge PrecautionsAfter the repairs the oil pressure looks good:
I aim to keep it that way.
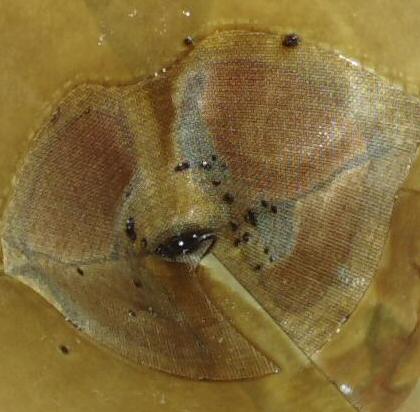
Frequent Oil ScreeningScraping the head as the Audi Sludge TSB states is not ideal. You can't get in every nook and cranny and scraping will dislodge the sludge, inevitably leaving some particles behind. These will move to the oil pan. The passages from the head down to the oil pan are large and unlikely to clog. The next item to clog is the suction pickup screen for the oil pump. when that happens oil pressure is lost, which is the first critical problem caused by sludge.I couldn't bring myself to change $25 in M1 0W-40 oil every few hundred miles so I bought a pack of paint filters to strain my drained oil so that I could reuse it. Here is what I got 1200 miles since the desludging and 900 miles since
the previous straining:
1400 miles since desluge and oil change / 200 since straining:
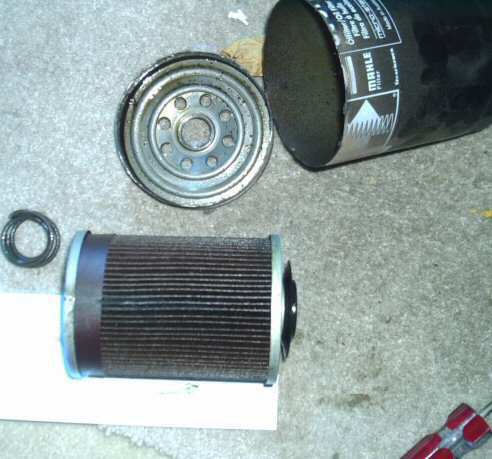
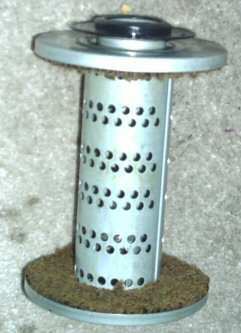
Oil Filter Autopsy (Mahle)(If someone would like to do this with a filter used for 5,000 - 10,000 mileson a clean 1.8T I'd love to see it.) Here are the innards of the Mahle filter (#068115561) I just took off my A4 1.8T at 43,000 miles, 1400 miles since cleaning the sludge according to the Audi Sludge TSB. This was the first filter used since cleaning the engine. Though, if I remember correctly, I ran the engine after the repair and then replaced the filter with this one. Filter parts:
Not much to it. A spring holds the core and gasket against the open
end. The gasket seals the incoming oil from the flow out the center and
keeps oil from draining back into the pan when the engine is stopped. There
is a spring loaded gasket at the other end that will allow oil to bypass
clogged paper if the pressure differential within the filter gets too high.
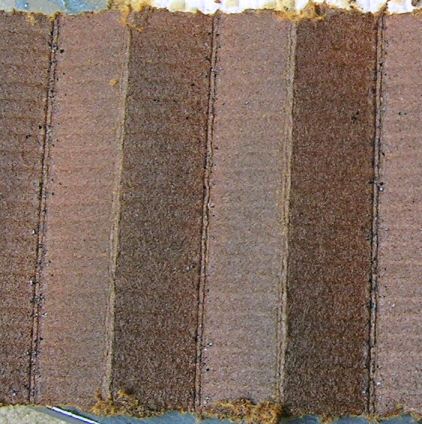
The filter paper stretched out: Used a hand saw to cut it out
I feel the TSB cuts corners, to do it right the head should probably be pulled and soaked in solvent instead of scraped by hand in place. Hopefully, next time this won't be so bad. It actually doesn't seem
that bad now considering the amount of crud
I removed from the head.
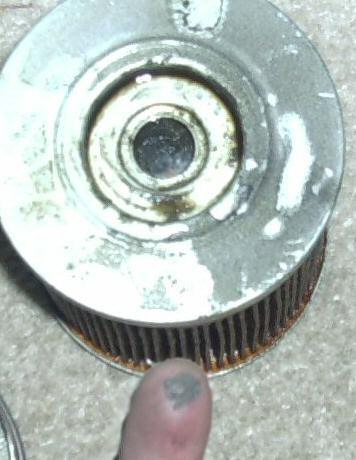
A fine, metallic dust on the closed end that I hope would be typical
of any engine (this may have been the result of the thick cut off wheel I used
initially to cut the oil can): People make a lot of fuss over filters. Obviously you want something of sufficient quality that the seals, gaskets and paper work as intended, but none of that should be hard for stuff as simple as that. The main difference I can see is that larger is better (though there is no reason to oversize given a specified change interval and engine). This filter probably has at least twice the surface area of the originally specified filter. That means the same paper should be able to hold twice as many impurities before clogging. The only other factor is the type of paper. Some are paper (cellulose) and some are synthetic. Paper choice will determine the largest sized particles that are allowed to pass through to the bearings. There are some drawbacks to blocking small particles. The paper will clog sooner. If that happens before it is changed then oil will bypass the paper altogether allowing even the large particles to reach the bearings. It would also be interesting to know if thick, cold oil bypasses the paper to some extent and whether this would occur even more so with a paper of a finer mesh.
Here is another analysis with information from those with some experience. Quoting from that page:
|
||||||||||||||||||||||


 I
cut it open using several of those cheap rotary tool cut-off wheels that
I
cut it open using several of those cheap rotary tool cut-off wheels that


Other Documentation
My rants in groups along with the replies
Other words
Chapter One - Motor Oil 101: http://members.rennlist.com/oil/Motor%20Oil%20101.htm
![]()